HTTP 服务简单案例
简单案例
先尝试通过net/http包对http服务进行简单了解
package main

import (
	"fmt"
	"net/http"
)

func main() {
	http.HandleFunc("/", func(w http.ResponseWriter, r *http.Request) {
		w.Write([]byte("Hello World"))
	})

	if err := http.ListenAndServe(":8000", nil); err != nil {
		fmt.Println("start http server fail:", err)
	}
}
http报文
先简单了解一下http中传送的信息是什么
用于http协议交互的信息称为http报文
请求报文
一个HTTP请求报文由请求行(request line) 、请求头部(header)、空行和请求数据4个部分组成。
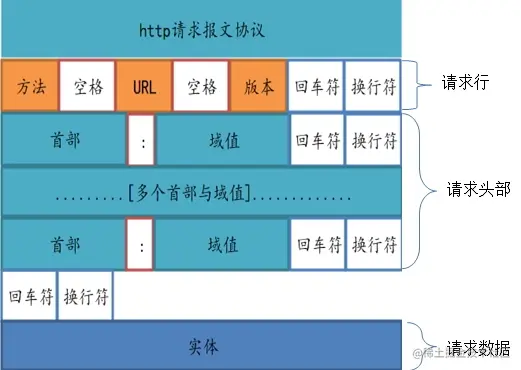
请求头部由关键字/值对组成,每行一对
典型的请求头有:
● User-Agent:产生请求的浏览器类型;
● Accept:客户端可识别的响应内容类型列表;星号 “ * ” 用于按范围将类型分组,用 “ / ” 指示可接受全部类型,用“ type/* ”指示可接受 type 类型的所有子类型; 比如 Accept:text/xml(application/json)表示希望接受到的是xml(json)类型。
● Accept-Language:客户端可接受的自然语言;
● Accept-Encoding:客户端可接受的编码压缩格式;
● Accept-Charset:可接受的应答的字符集;
● Host:请求的主机名,允许多个域名同处一个IP 地址,即虚拟主机;
● connection:连接方式(close 或 keepalive);
● Cookie:存储于客户端扩展字段,向同一域名的服务端发送属于该域的cookie;
● Content-Type:发送端发送的实体数据的数据类型。 比如,Content-Type:text/html(application/json)表示发送的是html类型。
响应报文
由状态行,响应首部,响应实体组成
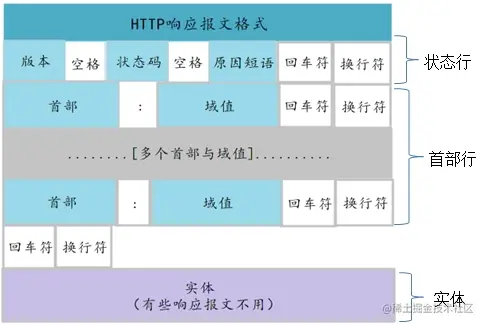
状态行
状态行由三部分组成:服务器HTTP协议版本,响应状态码,状态码的文本描述
格式:HTTP-Version Status-Code Reason-Phrase CRLF
比如:HTTP/1.1 200 OK
状态码:由3位数字组成,第一个数字定义了响应的类别
响应首部(首部行):位于响应报文状态行之后
Date标头:消息产生的时间
Age标头:(从最初创建开始)响应持续时间
Server标头: 向客户端标明服务器程序名称和版本
ETage标头:不透明验证者
Location标头:URL备用的位置
Content-Length标头:实体的长度
Content-Tyep标头:实体的媒体类型
协商首部: Accept-Ranges: 对当前资源来讲,服务器所能够接受的范围类型 Vary: 首部列表,服务器会根据列表中的内容挑选出最适合的版本发送给客户端 跟安全相关的响应首部: Set-Cookie: 服务器端在某客户端第一次请求时发给令牌 WWW-Authentication: 质询,即要求客户提供帐号和密码
响应实体:位于响应首部(首部行)之后
实体包含了Web客户端请求的对象。Content-Length标头及Content-Type标头用于计算实体的位置、数据类型和数据长度。当Web服务器接收到Web客户端的请求报文后,对HTTP请求报文进行解析,并将Web客户端的请求的对象取出打包,通过HTTP响应报文将数据传回给Web客户端,如果出现错误则返回包含对应错误的错误代码和错误原因的HTTP响应报文。
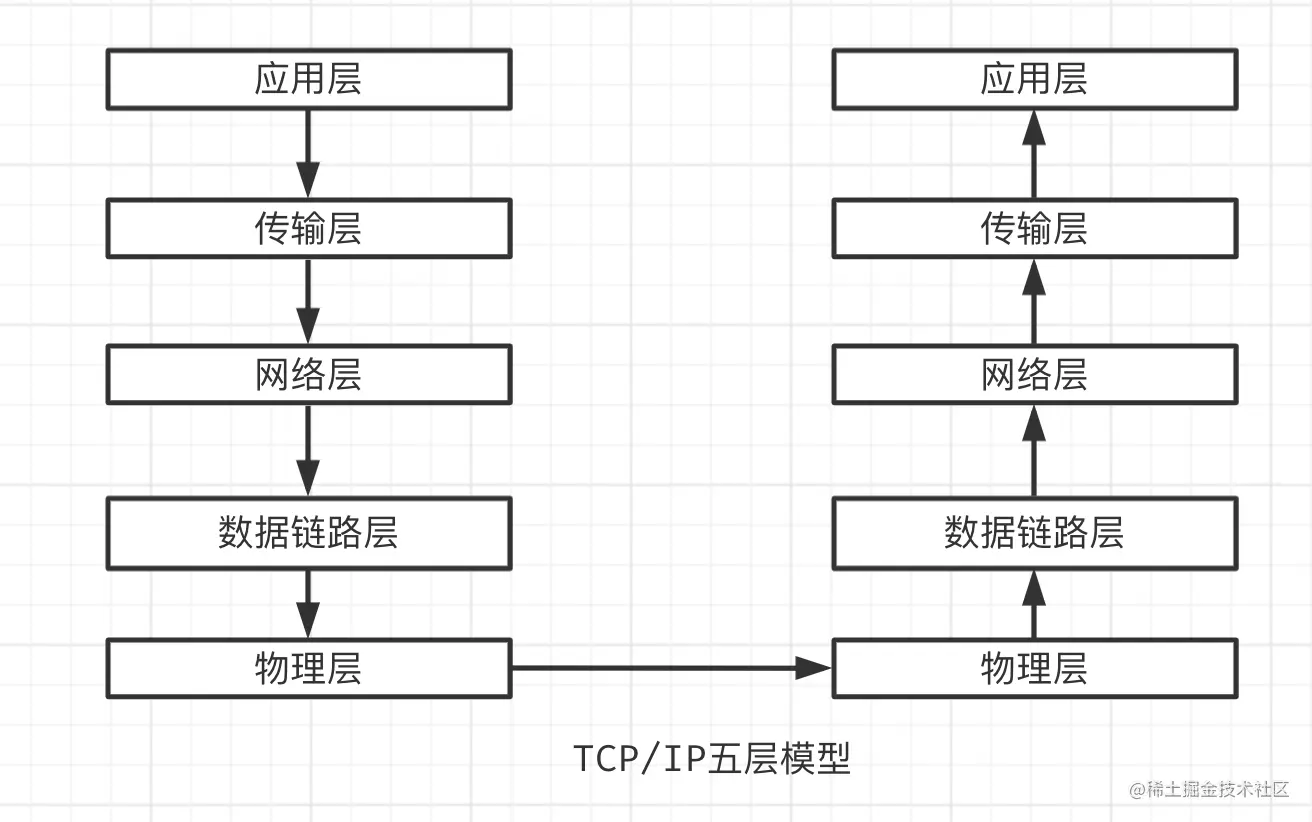
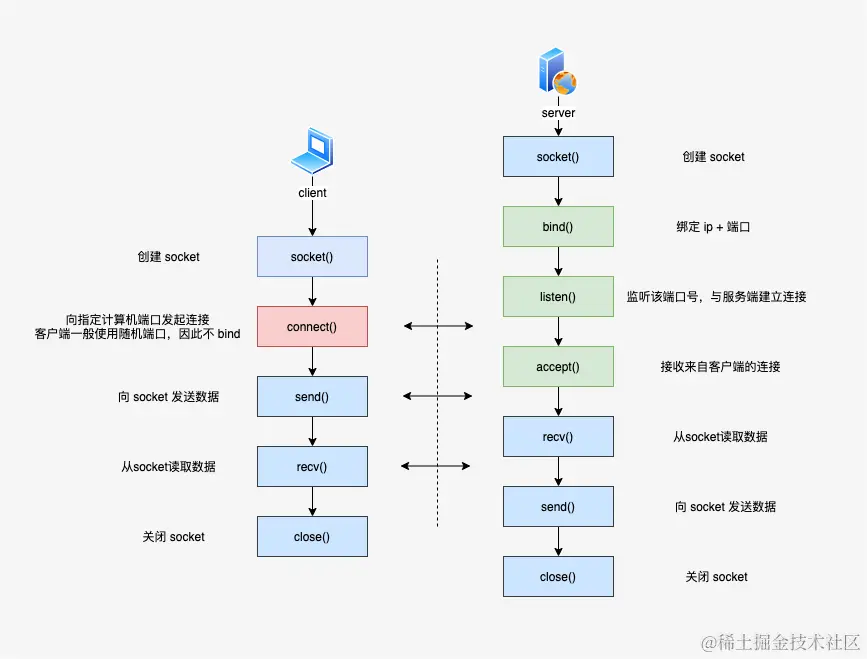
在TCP/IP五层模型下, HTTP位于应用层, 需要有传输层来承载HTTP协议. 传输层比较常见的协议是TCP,UDP, SCTP等. 由于UDP不可靠, SCTP有自己特殊的运用场景, 所以一般情况下HTTP是由TCP协议承载的(可以使用wireshark抓包然后查看各层协议)
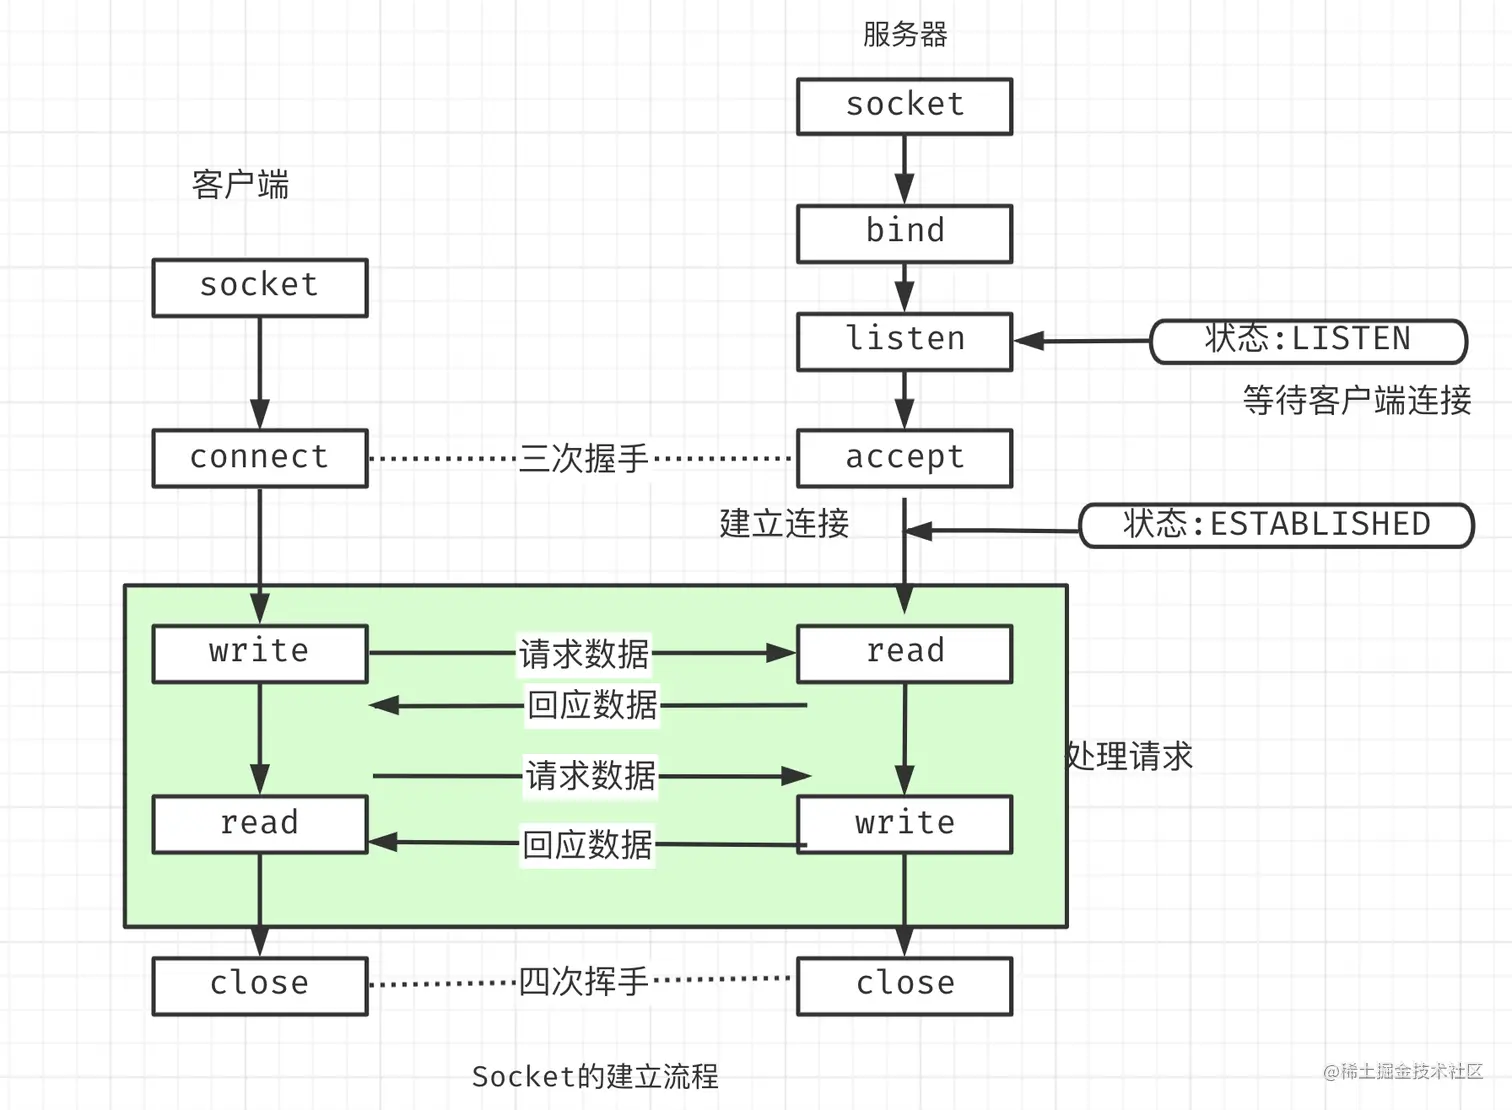
使用TCP协议的话, 就会涉及到TCP是如何建立起来的. 面试中能够常遇到的名词三次握手, 四次挥手就是在这里产生的. 具体的建立流程就不在陈述了, 大概流程就是图中左半边
所以说, 要想能够对客户端http请求进行回应的话, 就首先需要建立起来TCP连接, 也就是socket. 下面要看下net/http是如何建立起来socket
注册路由
| |
这段代码是在注册一个路由及这个路由的handler到DefaultServeMux中
Handler,它是请求的处理对象,Handler对象需要实现ServeHTTP方法,ServeHTTP执行的是我们的业务逻辑,一般我们定义的func(w http.ResponseWriter, r *http.Request)的方法需要经过http.HandlerFunc包装为Handler对象
handler
// Handler接口
type Handler interface {
	ServeHTTP(ResponseWriter, *Request)
}

// The HandlerFunc type is an adapter to allow the use of
// ordinary functions as HTTP handlers. If f is a function
// with the appropriate signature, HandlerFunc(f) is a
// Handler that calls f.
type HandlerFunc func(ResponseWriter, *Request)

func (f HandlerFunc) ServeHTTP(w ResponseWriter, r *Request) {
	f(w, r)
}
request
// A Request represents an HTTP request received by a server
// or to be sent by a client.
//
// The field semantics differ slightly between client and server
// usage. In addition to the notes on the fields below, see the
// documentation for Request.Write and RoundTripper.
type Request struct {
   // Method specifies the HTTP method (GET, POST, PUT, etc.).
   // For client requests, an empty string means GET.
   //
   // Go's HTTP client does not support sending a request with
   // the CONNECT method. See the documentation on Transport for
   // details.
   Method string

   // URL specifies either the URI being requested (for server
   // requests) or the URL to access (for client requests).
   //
   // For server requests, the URL is parsed from the URI
   // supplied on the Request-Line as stored in RequestURI.  For
   // most requests, fields other than Path and RawQuery will be
   // empty. (See RFC 7230, Section 5.3)
   //
   // For client requests, the URL's Host specifies the server to
   // connect to, while the Request's Host field optionally
   // specifies the Host header value to send in the HTTP
   // request.
   URL *url.URL

   // The protocol version for incoming server requests.
   //
   // For client requests, these fields are ignored. The HTTP
   // client code always uses either HTTP/1.1 or HTTP/2.
   // See the docs on Transport for details.
   Proto      string // "HTTP/1.0"
   ProtoMajor int    // 1
   ProtoMinor int    // 0

   // For client requests, certain headers such as Content-Length
   // and Connection are automatically written when needed and
   // values in Header may be ignored. See the documentation
   // for the Request.Write method.
   Header Header

   // Body is the request's body.
   //
   // For client requests, a nil body means the request has no
   // body, such as a GET request. The HTTP Client's Transport
   // is responsible for calling the Close method.
   //
   // For server requests, the Request Body is always non-nil
   // but will return EOF immediately when no body is present.
   // The Server will close the request body. The ServeHTTP
   // Handler does not need to.
   //
   // Body must allow Read to be called concurrently with Close.
   // In particular, calling Close should unblock a Read waiting
   // for input.
   Body io.ReadCloser

   // GetBody defines an optional func to return a new copy of
   // Body. It is used for client requests when a redirect requires
   // reading the body more than once. Use of GetBody still
   // requires setting Body.
   //
   // For server requests, it is unused.
   GetBody func() (io.ReadCloser, error)

   // ContentLength records the length of the associated content.
   // The value -1 indicates that the length is unknown.
   // Values >= 0 indicate that the given number of bytes may
   // be read from Body.
   //
   // For client requests, a value of 0 with a non-nil Body is
   // also treated as unknown.
   ContentLength int64

   TransferEncoding []string

   // Close indicates whether to close the connection after
   // replying to this request (for servers) or after sending this
   // request and reading its response (for clients).
   //
   // For server requests, the HTTP server handles this automatically
   // and this field is not needed by Handlers.
   //
   // For client requests, setting this field prevents re-use of
   // TCP connections between requests to the same hosts, as if
   // Transport.DisableKeepAlives were set.
   Close bool

   // For server requests, Host specifies the host on which the
   // URL is sought. For HTTP/1 (per RFC 7230, section 5.4), this
   // is either the value of the "Host" header or the host name
   // given in the URL itself. For HTTP/2, it is the value of the
   // ":authority" pseudo-header field.
   // It may be of the form "host:port". For international domain
   // names, Host may be in Punycode or Unicode form. Use
   // golang.org/x/net/idna to convert it to either format if
   // needed.
   // To prevent DNS rebinding attacks, server Handlers should
   // validate that the Host header has a value for which the
   // Handler considers itself authoritative. The included
   // ServeMux supports patterns registered to particular host
   // names and thus protects its registered Handlers.
   //
   // For client requests, Host optionally overrides the Host
   // header to send. If empty, the Request.Write method uses
   // the value of URL.Host. Host may contain an international
   // domain name.
   Host string

   // Form contains the parsed form data, including both the URL
   // field's query parameters and the PATCH, POST, or PUT form data.
   // This field is only available after ParseForm is called.
   // The HTTP client ignores Form and uses Body instead.
   Form url.Values

   // PostForm contains the parsed form data from PATCH, POST
   // or PUT body parameters.
   //
   // This field is only available after ParseForm is called.
   // The HTTP client ignores PostForm and uses Body instead.
   PostForm url.Values

   // MultipartForm is the parsed multipart form, including file uploads.
   // This field is only available after ParseMultipartForm is called.
   // The HTTP client ignores MultipartForm and uses Body instead.
   MultipartForm *multipart.For
   Trailer Header

   // RemoteAddr allows HTTP servers and other software to record
   // the network address that sent the request, usually for
   // logging. This field is not filled in by ReadRequest and
   // has no defined format. The HTTP server in this package
   // sets RemoteAddr to an "IP:port" address before invoking a
   // handler.
   // This field is ignored by the HTTP client.
   RemoteAddr string

   // RequestURI is the unmodified request-target of the
   // Request-Line (RFC 7230, Section 3.1.1) as sent by the client
   // to a server. Usually the URL field should be used instead.
   // It is an error to set this field in an HTTP client request.
   RequestURI string

   // TLS allows HTTP servers and other software to record
   // information about the TLS connection on which the request
   // was received. This field is not filled in by ReadRequest.
   // The HTTP server in this package sets the field for
   // TLS-enabled connections before invoking a handler;
   // otherwise it leaves the field nil.
   // This field is ignored by the HTTP client.
   TLS *tls.ConnectionState

   // Cancel is an optional channel whose closure indicates that the client
   // request should be regarded as canceled. Not all implementations of
   // RoundTripper may support Cancel.
   //
   // For server requests, this field is not applicable.
   //
   // Deprecated: Set the Request's context with NewRequestWithContext
   // instead. If a Request's Cancel field and context are both
   // set, it is undefined whether Cancel is respected.
   Cancel <-chan struct{}

   // Response is the redirect response which caused this request
   // to be created. This field is only populated during client
   // redirects.
   Response *Response

   // ctx is either the client or server context. It should only
   // be modified via copying the whole Request using WithContext.
   // It is unexported to prevent people from using Context wrong
   // and mutating the contexts held by callers of the same request.
   ctx context.Context
}
responsewriter
type ResponseWriter interface {
   // Header returns the header map that will be sent by
   // WriteHeader. The Header map also is the mechanism with which
   // Handlers can set HTTP trailers.
   //
   // Changing the header map after a call to WriteHeader (or
   // Write) has no effect unless the HTTP status code was of the
   // 1xx class or the modified headers are trailers.
   //
   // There are two ways to set Trailers. The preferred way is to
   // predeclare in the headers which trailers you will later
   // send by setting the "Trailer" header to the names of the
   // trailer keys which will come later. In this case, those
   // keys of the Header map are treated as if they were
   // trailers. See the example. The second way, for trailer
   // keys not known to the Handler until after the first Write,
   // is to prefix the Header map keys with the TrailerPrefix
   // constant value. See TrailerPrefix.
   //
   // To suppress automatic response headers (such as "Date"), set
   // their value to nil.
   Header() Header

   // Write writes the data to the connection as part of an HTTP reply.
   //
   // If WriteHeader has not yet been called, Write calls
   // WriteHeader(http.StatusOK) before writing the data. If the Header
   // does not contain a Content-Type line, Write adds a Content-Type set
   // to the result of passing the initial 512 bytes of written data to
   // DetectContentType. Additionally, if the total size of all written
   // data is under a few KB and there are no Flush calls, the
   // Content-Length header is added automatically.
   //
   // Depending on the HTTP protocol version and the client, calling
   // Write or WriteHeader may prevent future reads on the
   // Request.Body. For HTTP/1.x requests, handlers should read any
   // needed request body data before writing the response. Once the
   // headers have been flushed (due to either an explicit Flusher.Flush
   // call or writing enough data to trigger a flush), the request body
   // may be unavailable. For HTTP/2 requests, the Go HTTP server permits
   // handlers to continue to read the request body while concurrently
   // writing the response. However, such behavior may not be supported
   // by all HTTP/2 clients. Handlers should read before writing if
   // possible to maximize compatibility.
   Write([]byte) (int, error)

   // WriteHeader sends an HTTP response header with the provided
   // status code.
   //
   // If WriteHeader is not called explicitly, the first call to Write
   // will trigger an implicit WriteHeader(http.StatusOK).
   // Thus explicit calls to WriteHeader are mainly used to
   // send error codes or 1xx informational responses.
   //
   // The provided code must be a valid HTTP 1xx-5xx status code.
   // Any number of 1xx headers may be written, followed by at most
   // one 2xx-5xx header. 1xx headers are sent immediately, but 2xx-5xx
   // headers may be buffered. Use the Flusher interface to send
   // buffered data. The header map is cleared when 2xx-5xx headers are
   // sent, but not with 1xx headers.
   //
   // The server will automatically send a 100 (Continue) header
   // on the first read from the request body if the request has
   // an "Expect: 100-continue" header
   WriteHeader(statusCode int)
}
ServeMux,它相当于一个路由注册器,保存的请求路径pattern和Handler对象的map表,通过pattern找到对应的Handler对象,然后执行Handler对象的ServeHTTP方法 简单的说,http的执行对象是handler,而要成为handler对象.则必须实现ServeHTTP方法,例如HandlerFunc实现了ServeHTTP方法,所以它也是一个handler对象
type ServeMux struct {
    mu    sync.RWMutex
    m     map[string]muxEntry
    hosts bool
}

type muxEntry struct {
    explicit bool
    h        Handler
    pattern  string
}

// ServeMux也拥有ServeHTTP方法,也就说ServeMux实现了Handler接口,即ServeMuX其实也是一个Handler对象,不过ServeMux的ServeHTTP方法不是用来处理request和respone,而是用来找到路由注册的handler
func (mux *ServeMux) ServeHTTP(w ResponseWriter, r *Request) {
	if r.RequestURI == "*" {
		if r.ProtoAtLeast(1, 1) {
			w.Header().Set("Connection", "close")
		}
		w.WriteHeader(StatusBadRequest)
		return
	}
	h, _ := mux.Handler(r)
	h.ServeHTTP(w, r)
}
服务监听及响应
上面路由已经注册到net/http了, 下面就该如何建立socket了, 以及最后又如何取到已经注册到的路由, 将正确的响应信息从handler中取出来返回给客户端
1.创建 socket
| |
2. Accept 等待客户端链接
| |
3. 提供回调接口 ServeHTTP
| |
4. 回调到实际要执行的 ServeHTTP
| |
这基本是整个过程的代码了.
ln, err := net.Listen("tcp", addr)做了初试化了socket,bind,listen的操作.rw, e := l.Accept()进行accept, 等待客户端进行连接go c.serve(ctx)启动新的goroutine来处理本次请求. 同时主goroutine继续等待客户端连接, 进行高并发操作h, _ := mux.Handler(r)获取注册的路由, 然后拿到这个路由的handler, 然后将处理结果返回给客户端
从这里也能够看出来, net/http基本上提供了全套的服务.
接下来回到gin这一简单易用的框架来开启我们的第一个web项目
单体架构
此前可能一个main.go文件便可以满足需求,但在后续开发中一个文件不太现实。所以或许可以尝试简单的分包
├── README.md
├── api
├── dao
├── go.mod
├── model
└── utils
- README.md:项目的说明文档
- api:接口层,在里面是详细的逻辑实现以及路由。
- dao:全名为 data access object,进行数据库操作。
- model:模型层,主要放数据库实例的结构体。
- utils:一些常用的工具函数,封装在这里减少代码的重复使用。
- go.mod:依赖管理
首先拉取gin框架并测试案例
| |
使用postman简单测试一下得到预期返回
接下来尝试对案例进行分析
首先我们通过gin.Default()启动了一个engine
engine是gin框架的入口,我们可以通过它来定义服务路由信息、组装插件、运行服务等。
// Default returns an Engine instance with the Logger and Recovery middleware already attached.
func Default() *Engine {
	debugPrintWARNINGDefault()
	engine := New()
	engine.Use(Logger(), Recovery())
	return engine
}
// Engine is the framework's instance, it contains the muxer, middleware and configuration settings.
// Create an instance of Engine, by using New() or Default()
type Engine struct {
	RouterGroup
	RedirectTrailingSlash bool
	ForwardedByClientIP bool
	UseRawPath bool
	UnescapePathValues bool
	RemoveExtraSlash bool
	RemoteIPHeaders []string
	TrustedPlatform string
	MaxMultipartMemory int64
	UseH2C bool
	ContextWithFallback bool

	delims           render.Delims
	secureJSONPrefix string
	HTMLRender       render.HTMLRender
	FuncMap          template.FuncMap
	allNoRoute       HandlersChain
	allNoMethod      HandlersChain
	noRoute          HandlersChain
	noMethod         HandlersChain
	pool             sync.Pool
	trees            methodTrees
	maxParams        uint16
	maxSections      uint16
	trustedProxies   []string
	trustedCIDRs     []*net.IPNet
}
其中可以看到engine中有一个RouterGroup,RouterGroup 是对路由树的包装,所有的路由规则最终都是由它来进行管理。Engine 结构体继承了 RouterGroup ,所以 Engine 直接具备了 RouterGroup 所有的路由管理功能。这是为什么在例子中,可以直接使用 Engine 对象来定义路由规则。
RouterGroup 实现了 IRouter 接口,暴露了一系列路由方法,这些方法最终都是通过调用 Engine.addRoute 方法将请求处理器挂接到路由树中。
// IRoutes defines all router handle interface.
type IRoutes interface {
	Use(...HandlerFunc) IRoutes

	Handle(string, string, ...HandlerFunc) IRoutes
	Any(string, ...HandlerFunc) IRoutes
	GET(string, ...HandlerFunc) IRoutes
	POST(string, ...HandlerFunc) IRoutes
	DELETE(string, ...HandlerFunc) IRoutes
	PATCH(string, ...HandlerFunc) IRoutes
	PUT(string, ...HandlerFunc) IRoutes
	OPTIONS(string, ...HandlerFunc) IRoutes
	HEAD(string, ...HandlerFunc) IRoutes
	Match([]string, string, ...HandlerFunc) IRoutes

	StaticFile(string, string) IRoutes
	StaticFileFS(string, string, http.FileSystem) IRoutes
	Static(string, string) IRoutes
	StaticFS(string, http.FileSystem) IRoutes
}
gin.Default() 函数会生成一个默认的 Engine 对象,里面包含了 2 个默认的常用插件,分别是 Logger 和 Recovery,Logger 用于输出请求日志,Recovery 确保单个请求发生 panic 时记录异常堆栈日志,输出统一的错误响应。
r.Get()
// GET is a shortcut for router.Handle("GET", path, handlers).
func (group *RouterGroup) GET(relativePath string, handlers ...HandlerFunc) IRoutes {
	return group.handle(http.MethodGet, relativePath, handlers)
}

//此处也有HandlerFunc,似乎与上文的HandlerFunc完全不一样

// HandlerFunc defines the handler used by gin middleware as return value.
type HandlerFunc func(*Context)

//再看Context

// Context is the most important part of gin. It allows us to pass variables between middleware,
// manage the flow, validate the JSON of a request and render a JSON response for example.
type Context struct {
	writermem responseWriter
	Request   *http.Request
	Writer    ResponseWriter

	Params   Params
	handlers HandlersChain
	index    int8
	fullPath string

	engine       *Engine
	params       *Params
	skippedNodes *[]skippedNode

	// This mutex protects Keys map.
	mu sync.RWMutex

	// Keys is a key/value pair exclusively for the context of each request.
	Keys map[string]any

	// Errors is a list of errors attached to all the handlers/middlewares who used this context.
	Errors errorMsgs

	// Accepted defines a list of manually accepted formats for content negotiation.
	Accepted []string

	// queryCache caches the query result from c.Request.URL.Query().
	queryCache url.Values

	// formCache caches c.Request.PostForm, which contains the parsed form data from POST, PATCH,
	// or PUT body parameters.
	formCache url.Values

	// SameSite allows a server to define a cookie attribute making it impossible for
	// the browser to send this cookie along with cross-site requests.
	sameSite http.SameSite
}

type responseWriter struct {
	http.ResponseWriter
	size   int
	status int
}

//可以看到其中的Request和ResponseWriter
可以大致用上文提到的handlerfunc来进行理解,该函数大致为处理请求并返回响应的逻辑部分。即通过get请求访问/ping后返回了一个json数据。
// JSON serializes the given struct as JSON into the response body.
// It also sets the Content-Type as "application/json".
func (c *Context) JSON(code int, obj any) {
	c.Render(code, render.JSON{Data: obj})
}

// H is a shortcut for map[string]any
type H map[string]any
再继续深入r.Get()看看是如何处理handler和route
func (group *RouterGroup) handle(httpMethod, relativePath string, handlers HandlersChain) IRoutes {
	absolutePath := group.calculateAbsolutePath(relativePath)//先不管
	handlers = group.combineHandlers(handlers)//加handlers
	group.engine.addRoute(httpMethod, absolutePath, handlers)//加route
	return group.returnObj()
}
//出现了一个新东西HandlersChain
func (group *RouterGroup) combineHandlers(handlers HandlersChain) HandlersChain {
finalSize := len(group.Handlers) + len(handlers)
assert1(finalSize < int(abortIndex), "too many handlers")
mergedHandlers := make(HandlersChain, finalSize)
copy(mergedHandlers, group.Handlers)
copy(mergedHandlers[len(group.Handlers):], handlers)
return mergedHandlers
}
// HandlersChain defines a HandlerFunc slice.
type HandlersChain []HandlerFunc
//可以看到是将函数加入了函数链中
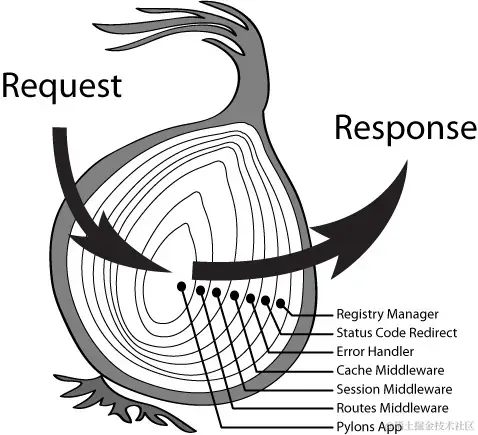
//具体来说就是牵扯到了中间件,这是因为 Gin 提供了中间件,只有函数链的尾部是业务处理,前面的部分都是中间件函数。在 Gin 中中间件和业务处理函数形式是一样的,都是 func(*Context)。当我们定义路由时,Gin 会将中间件函数和业务处理函数合并在一起形成一个链条结构。
额外补充Next和About
其中next为先跳过当前的去执行后续函数链
about则是将后续的干掉,执行完当前的
// Next should be used only inside middleware.
// It executes the pending handlers in the chain inside the calling handler.
// See example in GitHub.
func (c *Context) Next() {
c.index++
for c.index < int8(len(c.handlers)) {
c.handlers[c.index](c)
c.index++
}
}
// Abort prevents pending handlers from being called. Note that this will not stop the current handler.
// Let's say you have an authorization middleware that validates that the current request is authorized.
// If the authorization fails (ex: the password does not match), call Abort to ensure the remaining handlers
// for this request are not called.
func (c *Context) Abort() {
c.index = abortIndex
}
func main() {
	r := gin.Default()
	//在这里使用了三个中间件
	r.Use(mid1(), mid2(), mid3())
	r.GET("/abc", func(context *gin.Context) {
		fmt.Println("1")
	})
	_ = r.Run(":8081")
}

func mid1() gin.HandlerFunc {
	return func(c *gin.Context) {
		fmt.Println("mid1 before")
		//先执行next,后执行after
		c.Next()
		fmt.Println("mid1 after")
	}
}
func mid2() gin.HandlerFunc {
	return func(c *gin.Context) {
		fmt.Println("mid2 before")
		c.Abort()
		//c.Next()
		fmt.Println("mid2 after")
	}
}

func mid3() gin.HandlerFunc {
	return func(c *gin.Context) {
		fmt.Println("mid3 before")
		//c.Next()
		fmt.Println("mid3 after")
	}
}
mid1 before
mid2 before
mid3 before
mid3 after
1
mid2 after
mid1 after
func main() {
	r := gin.Default()
	//在这里使用了三个中间件
	r.Use(mid1(), mid2(), mid3())
	r.GET("/abc", func(context *gin.Context) {
		fmt.Println("1")
	})
	_ = r.Run(":8081")
}

func mid1() gin.HandlerFunc {
	return func(c *gin.Context) {
		fmt.Println("mid1 before")
		//先执行next,后执行after
		c.Next()
		fmt.Println("mid1 after")
	}
}
func mid2() gin.HandlerFunc {
	return func(c *gin.Context) {
		fmt.Println("mid2 before")
		c.Abort()
		//c.Next()
		fmt.Println("mid2 after")
	}
}

func mid3() gin.HandlerFunc {
	return func(c *gin.Context) {
		fmt.Println("mid3 before")
		//c.Next()
		fmt.Println("mid3 after")
	}
}
mid1 before
mid2 before
mid2 after
mid1 after
func main() {
	r := gin.Default()
	//在这里使用了三个中间件
	r.Use(mid1(), mid2(), mid3())
	r.GET("/abc", func(context *gin.Context) {
		fmt.Println("1")
	})
	_ = r.Run(":8081")
}

func mid1() gin.HandlerFunc {
	return func(c *gin.Context) {
		fmt.Println("mid1 before")
		//先执行next,后执行after
		c.Next()
		fmt.Println("mid1 after")
	}
}
func mid2() gin.HandlerFunc {
	return func(c *gin.Context) {
		fmt.Println("mid2 before")
		//c.Abort()
		c.Next()
		fmt.Println("mid2 after")
	}
}

func mid3() gin.HandlerFunc {
	return func(c *gin.Context) {
		fmt.Println("mid3 before")
		c.Next()
		fmt.Println("mid3 after")
	}
}
mid1 before
mid2 before
mid3 before
1
mid3 after
mid2 after
mid1 after
func main() {
	r := gin.Default()
	//在这里使用了三个中间件
	r.Use(mid1(), mid2(), mid3())
	r.GET("/abc", func(context *gin.Context) {
		fmt.Println("1")
	})
	_ = r.Run(":8081")
}

func mid1() gin.HandlerFunc {
	return func(c *gin.Context) {
		fmt.Println("mid1 before")
		//先执行next,后执行after
		//c.Next()
		fmt.Println("mid1 after")
	}
}
func mid2() gin.HandlerFunc {
	return func(c *gin.Context) {
		fmt.Println("mid2 before")
		//c.Abort()
		//c.Next()
		fmt.Println("mid2 after")
	}
}

func mid3() gin.HandlerFunc {
	return func(c *gin.Context) {
		fmt.Println("mid3 before")
		//c.Next()
		fmt.Println("mid3 after")
	}
}
mid1 before
mid1 after
mid2 before
mid2 after
mid3 before
mid3 after
1
所以一直next就变成洋葱模型了
在 Gin 框架中,路由规则被分成了最多 9 棵前缀树,每一个 HTTP Method对应一棵「前缀树」,树的节点按照 URL 中的 / 符号进行层级划分,URL 支持 :name 形式的名称匹配,还支持 *subpath 形式的路径通配符 。

每个节点都会挂接若干请求处理函数构成一个请求处理链 HandlersChain。当一个请求到来时,在这棵树上找到请求 URL 对应的节点,拿到对应的请求处理链来执行就完成了请求的处理。
type Engine struct {
  ...
  trees methodTrees
  ...
}

type methodTrees []methodTree

type methodTree struct {
	method string
	root   *node  // 树根
}

type node struct {
  path string // 当前节点的路径
  ...
  handlers HandlersChain // 请求处理链
  ...
}
最后是r.Run(),可以看到注释中说明了是http.ListenAndServe(addr, router)的快捷方式,对具体内容不过多赘述
// Run attaches the router to a http.Server and starts listening and serving HTTP requests.
// It is a shortcut for http.ListenAndServe(addr, router)
// Note: this method will block the calling goroutine indefinitely unless an error happens.
func (engine *Engine) Run(addr ...string) (err error) {
第一个复杂一点的 Web 服务
最后经过这样这样和那样那样的铺垫,正式进入一个复杂一点的web服务,选定为一个基本的登录注册功能。在此需要额外知识,即cookie、session、token 和 JWT。借此能够完成一个基本身份校验功能。
一、先了解几个基础概念
什么是认证(Authentication)
通俗地讲就是验证当前用户的身份。
互联网中的认证:
用户名密码登录、邮箱发送登录链接、手机号接收验证码。 只要你能收到邮箱/验证码,就默认你是账号的主人。
什么是授权(Authorization)
用户授予第三方应用访问该用户某些资源的权限。
实现授权的方式有:cookie、session、token、OAuth。
什么是凭证(Credentials)
实现认证和授权的前提是需要一种媒介(证书)来标记访问者的身份。
在互联网应用中,一般网站(如掘金)会有两种模式,游客模式和登录模式。游客模式下,可以正常浏览网站上面的文章,一旦想要点赞/收藏/分享文章,就需要登录或者注册账号。当用户登录成功后,服务器会给该用户使用的浏览器颁发一个令牌(token),这个令牌用来表明你的身份,每次浏览器发送请求时会带上这个令牌,就可以使用游客模式下无法使用的功能。
二、Cookie
Cookie 最开始被设计出来是为了弥补HTTP在状态管理上的不足。HTTP 协议是一个无状态协议,客户端向服务器发请求,服务器返回响应,故事就这样结束了,但是下次发请求如何让服务端知道客户端是谁呢?这种背景下,就产生了 Cookie。
- cookie 存储在客户端: cookie 是服务器发送到用户浏览器并保存在本地的一小块数据,它会在浏览器下次向同一服务器再发起请求时被携带并发送到服务器上。因此,服务端脚本就可以读、写存储在客户端的cookie的值。
- cookie 是不可跨域的: 每个 cookie 都会绑定单一的域名(绑定域名下的子域都是有效的),无法在别的域名下获取使用,同域名不同端口也是允许共享使用的。
服务端只需要设置 setCookie 这个 header,之后浏览器会自动把 cookie 写入到我们的浏览器存起来,然后当前域名在发送请求的时候都会自动带上这个 cookie。
三、Session
session 是另一种记录服务器和客户端会话状态的机制。session 是基于 cookie 实现的,session 存储在服务器端,sessionId 会被存储到客户端的cookie 中。
session 认证流程:
- 用户第一次请求服务器的时候,服务器根据用户提交的相关信息,创建对应的 Session
- 请求返回时将此 Session 的唯一标识 SessionID 返回给浏览器
- 浏览器接收到服务器返回的 SessionID 后,会将此信息存入到 Cookie 中,同时 Cookie 记录此 SessionID 属于哪个域名
- 当用户第二次访问服务器的时候,请求会自动把此域名下的 Cookie 信息也发送给服务端,服务端会从 Cookie 中获取 SessionID,
- 根据 SessionID 查找对应的 Session 信息,如果没有找到说明用户没有登录或者登录失效,如果找到 Session 证明用户已经登录可执行后面操作。
根据以上流程可知,SessionID 是连接 Cookie 和 Session 的一道桥梁,大部分系统也是根据此原理来验证用户登录状态。
四、Cookie 和 Session 的区别
- 安全性: Session 比 Cookie 安全,Session 是存储在服务器端的,Cookie 是存储在客户端的。
- 存取值的类型不同:Cookie 只支持存字符串数据,Session 可以存任意数据类型。
- 有效期不同: Cookie 可设置为长时间保持,比如我们经常使用的默认登录功能,Session 一般失效时间较短,客户端关闭(默认情况下)或者 Session 超时都会失效。
- 存储大小不同: 单个 Cookie 保存的数据不能超过 4K,Session 可存储数据远高于 Cookie,但是当访问量过多,会占用过多的服务器资源。
五、什么是 Token
Token 是访问接口(API)时所需要的资源凭证。
简单 token 的组成:
uid(用户唯一的身份标识)、time(当前时间的时间戳)、sign(签名,token 的前几位以哈希算法压缩成的一定长度的十六进制字符串)
特点:
- 服务端无状态化、可扩展性好
- 支持移动端设备
- 安全
- token 完全由应用管理,所以它可以避开同源策略
Access Token
Access Token 的身份验证流程:
- 客户端使用用户名跟密码请求登录
- 服务端收到请求,去验证用户名与密码
- 验证成功后,服务端会签发一个 token 并把这个 token 发送给客户端
- 客户端收到 token 以后,会把它存储起来,比如放在 localStorage 里
- 客户端每次发起请求的时候需要把 token 放到请求的 Header 里传给服务端
- 服务端收到请求,然后去验证客户端请求里面带着的 token ,如果验证成功,就向客户端返回请求的数据
Refresh Token
另外一种 token——refresh token
refresh token 是专用于刷新 access token 的 token。如果没有 refresh token,也可以刷新 access token,但每次刷新都要用户输入登录用户名与密码,会很麻烦。有了 refresh token,可以减少这个麻烦,客户端直接用 refresh token 去更新 access token,无需用户进行额外的操作。
Access Token 的有效期比较短,当 Acesss Token 由于过期而失效时,使用 Refresh Token 就可以获取到新的 Token,如果 Refresh Token 也失效了,用户就只能重新登录了。
Refresh Token 及过期时间是存储在服务器的数据库中,只有在申请新的 Acesss Token 时才会验证,不会对业务接口响应时间造成影响,也不需要向 Session 一样一直保持在内存中以应对大量的请求。
六、Token 和 Session 的区别
Session 是一种记录服务器和客户端会话状态的机制,使服务端有状态化,可以记录会话信息。而 Token 是令牌,访问资源接口(API)时所需要的资源凭证。Token 使服务端无状态化,不会存储会话信息。
Session 和 Token 并不矛盾,作为身份认证 Token 安全性比 Session 好,因为每一个请求都有签名还能防止监听以及重复攻击,而 Session 就必须依赖链路层来保障通讯安全了。如果你需要实现有状态的会话,仍然可以增加 Session 来在服务器端保存一些状态。
如果你的用户数据可能需要和第三方共享,或者允许第三方调用 API 接口,用 Token 。如果永远只是自己的网站,自己的 App,用什么就无所谓了。
七、什么是 JWT
JSON Web Token(简称 JWT)是目前最流行的跨域认证解决方案。是一种认证授权机制。
JWT 是为了在网络应用环境间传递声明而执行的一种基于 JSON 的开放标准。JWT 的声明一般被用来在身份提供者和服务提供者间传递被认证的用户身份信息,以便于从资源服务器获取资源。比如用在用户登录上。 可以使用 HMAC 算法或者是 RSA 的公/私秘钥对 JWT 进行签名。因为数字签名的存在,这些传递的信息是可信的。
- JWT 的原理
JWT 的原理是,服务器认证以后,生成一个 JSON 对象,返回给用户,就像下面这样。
| |
以后,用户与服务端通信的时候,都要发回这个 JSON 对象。服务器完全只靠这个对象认定用户身份。为了防止用户篡改数据,服务器在生成这个对象的时候,会加上签名。
JWT 认证流程:
用户输入用户名/密码登录,服务端认证成功后,会返回给客户端一个 JWT
客户端将 token 保存到本地(通常使用 localstorage,也可以使用 cookie)
当用户希望访问一个受保护的路由或者资源的时候,需要请求头的 Authorization 字段中使用Bearer 模式添加 JWT,其内容看起来是下面这样
Authorization: Bearer <token>- 服务端的保护路由将会检查请求头 Authorization 中的 JWT 信息,如果合法,则允许用户的行为
- 因为 JWT 是自包含的(内部包含了一些会话信息),因此减少了需要查询数据库的需要
- 因为 JWT 并不使用 Cookie 的,所以你可以使用任何域名提供你的 API 服务而不需要担心跨域问题
- 因为用户的状态不再存储在服务端的内存中,所以这是一种无状态的认证机制生成
八、Token 和 JWT 的区别
相同:
- 都是访问资源的令牌
- 都可以记录用户的信息
- 都是使服务端无状态化
- 都是只有验证成功后,客户端才能访问服务端上受保护的资源
区别:
Token:服务端验证客户端发送过来的 Token 时,还需要查询数据库获取用户信息,然后验证 Token 是否有效。
JWT: 将 Token 和 Payload 加密后存储于客户端,服务端只需要使用密钥解密进行校验(校验也是 JWT 自己实现的)即可,不需要查询或者减少查询数据库,因为 JWT 自包含了用户信息和加密的数据。
cors(跨域资源共享)
是一种基于 HTTP 头的机制,该机制通过允许服务器标示除了它自己以外的其他源(域、协议或端口),使得浏览器允许这些源访问加载自己的资源。跨源资源共享还通过一种机制来检查服务器是否会允许要发送的真实请求,该机制通过浏览器发起一个到服务器托管的跨源资源的“预检”请求。在预检中,浏览器发送的头中标示有 HTTP 方法和真实请求中会用到的头。
在 CORS 机制中, 把请求分为了 简单请求 和 复杂请求, 一个 HTTP 请求若想要让自己成为一个简单请求就要满足以下条件:
首先, 请求方式的限制: 请求方式(method) 只能是
GET POST HEAD三者中的一个其次就是请求头字段的限制: 请求头字段必须包含在以下集合中, 包括:
Accept Accept-Language Content-Language Content-Type DPR Downlink Save-Data Viewport-Width Width.其次就是请求头值的限制: 当请求头中包含
Content-Type的时候, 其值必须为text/plain multipart/form-data application/x-www-form-urlencoded(这个是 form 提交默认的 Content-Type)三者中的一个.对于复杂请求则需先以
OPTIONS方法发起一个预检请求
开始开发
先编写model
在 model 文件夹下我们创建一个 user.go 文件,内容如下
package model

type User struct {
	Username string
	Password string
}
然后可以开始考虑考虑具体逻辑
注册:验证用户是否注册->已注册则退出,未注册则注册
登录:验证用户是否存在->验证密码是否正确->登录
在这过程中我们会发现存在与数据库的交互,例如写入新注册用户,查找用户和密码等,将与数据库有关的抽离出来,在dao层实现
| |
因为未学数据库固使用map记录
| |
目前实现基本功能,接下来完成路由组定义
| |
最后在 main.go 将其跑起来
main.go
package main

import "gin-demo/api"

func main() {
	api.InitRouter()
}
接下来考虑追加jwt和cors
JWT
在实际生产中,我们一般还是使用 JWT 偏多, cookie 的使用很少。
关于 JWT 的使用参考 https://www.liwenzhou.com/posts/Go/jwt_in_gin/
这个很重要,我觉得李文周老师肯定比我讲的好,索性直接贴李文周老师的博客了
首先把我们需要的第三方库给拉下来
| |
这里就直接给出最后的代码了。
api/user.go
// 仅有登录部分有改动
func login(c *gin.Context) {
	if err := c.ShouldBind(&model.User{}); err != nil {
		utils.RespFail(c, "verification failed")
		return
	}
	// 传入用户名和密码
	username := c.PostForm("username")
	password := c.PostForm("password")

	// 验证用户名是否存在
	flag := dao.SelectUser(username)
	// 不存在则退出
	if !flag {
		// 以 JSON 格式返回信息
		utils.RespFail(c, "user doesn't exists")
		return
	}

	// 查找正确的密码
	selectPassword := dao.SelectPasswordFromUsername(username)
	// 若不正确则传出错误
	if selectPassword != password {
		// 以 JSON 格式返回信息
		utils.RespFail(c, "wrong password")
		return
	}

	// 正确则登录成功
	// 创建一个我们自己的声明
	claim := model.MyClaims{
		Username: username, // 自定义字段
		StandardClaims: jwt.StandardClaims{
			ExpiresAt: time.Now().Add(time.Hour * 2).Unix(), // 过期时间
			Issuer:    "Yxh",                                // 签发人
		},
	}
	// 使用指定的签名方法创建签名对象
	token := jwt.NewWithClaims(jwt.SigningMethodHS256, claim)
	// 使用指定的secret签名并获得完整的编码后的字符串token
	tokenString, _ := token.SignedString(middleware.Secret)
	utils.RespSuccess(c, tokenString)
}
api/middleware/jwt.go
package middleware

import (
	"errors"
	"net/http"
	"strings"

	"gin-demo/model"
	"github.com/dgrijalva/jwt-go"
	"github.com/gin-gonic/gin"
)

var Secret = []byte("YXH")

// JWTAuthMiddleware 基于JWT的认证中间件
func JWTAuthMiddleware() func(c *gin.Context) {
	return func(c *gin.Context) {
		// 客户端携带Token有三种方式 1.放在请求头 2.放在请求体 3.放在URI
		// 这里假设Token放在Header的Authorization中,并使用Bearer开头
		// 这里的具体实现方式要依据你的实际业务情况决定
		authHeader := c.Request.Header.Get("Authorization")
		if authHeader == "" {
			c.JSON(http.StatusOK, gin.H{
				"code": 2003,
				"msg":  "请求头中auth为空",
			})
			c.Abort()
			return
		}
		// 按空格分割
		parts := strings.SplitN(authHeader, " ", 2)
		if !(len(parts) == 2 && parts[0] == "Bearer") {
			c.JSON(http.StatusOK, gin.H{
				"code": 2004,
				"msg":  "请求头中auth格式有误",
			})
			c.Abort()
			return
		}
		// parts[1]是获取到的tokenString,我们使用之前定义好的解析JWT的函数来解析它
		mc, err := ParseToken(parts[1])
		if err != nil {
			c.JSON(http.StatusOK, gin.H{
				"code": 2005,
				"msg":  "无效的Token",
			})
			c.Abort()
			return
		}
		// 将当前请求的username信息保存到请求的上下文c上
		c.Set("username", mc.Username)
		c.Next() // 后续的处理函数可以用过c.Get("username")来获取当前请求的用户信息
	}
}

// ParseToken 解析JWT
func ParseToken(tokenString string) (*model.MyClaims, error) {
	// 解析token
	token, err := jwt.ParseWithClaims(tokenString, &model.MyClaims{}, func(token *jwt.Token) (i interface{}, err error) {
		return Secret, nil
	})
	if err != nil {
		return nil, err
	}
	if claims, ok := token.Claims.(*model.MyClaims); ok && token.Valid { // 校验token
		return claims, nil
	}
	return nil, errors.New("invalid token")
}
为了测试,我们在 api 中再实现一个接口,这个接口可以通过 token 直接获得我们 token 中所设置的 “username”。
api/user.go
// 新增以下代码
func getUsernameFromToken(c *gin.Context) {
	username, _ := c.Get("username")
	utils.RespSuccess(c, username.(string))
}
再在 router.go 中使用我们的 JWT 中间件。在这里我们使用到了分组路由,逻辑很简单,看代码就懂了。
| |
作业
Lv0
重新敲一遍今天的代码。了解 RESTful API,了解不同请求方法的区别,了解 Query 与 PostFrom 的区别。
Lv1
使这个项目的“数据库”数据持久化,可以考虑使用文件操作完成。(禁止使用数据库)
Lv2
给这个项目添加修改密码、找回密码的功能,找回密码的逻辑有很多种,能实现一种就行。
Lv3
给这个项目添加留言板功能,数据通过文件保存在本地即可。
LvX
发挥你天马行空的想象力,实现你力所能及的任何功能。
提交格式照旧